Disclosure: Some links on this page are affiliate links. If you buy through them, I earn a small commission at no extra cost to you. I only recommend gear I actually believe in. Thanks for your support! — Jason
So you started with a USB microphone and now you want to level up. Smart move. XLR microphones give you better audio quality, a more reliable signal chain, and an upgrade path that scales with your show. Here’s exactly what you need to make the switch — and how to actually do it step by step.
Why XLR Is Worth the Switch
USB mics are convenient for getting started, but they have real limitations. The analog-to-digital conversion happens inside the mic body using miniaturized components — there’s no room for the quality of hardware you get in a dedicated audio interface. The gain control is limited. Multi-host setups get complicated fast. And the upgrade path from a USB mic is essentially starting over.
With XLR, you’re using the professional audio standard. Better preamps in a dedicated interface or recorder. Balanced cable runs that reject interference. Easy multi-mic expansion. An upgrade path where each component improves independently without replacing everything at once.
What You Need to Make the Switch
XLR microphones don’t plug directly into your computer. They need an audio interface or a digital recorder to convert the signal. Here’s what I recommend at two different price points and workflow preferences.
Option A: XLR Mic + Zoom H4n Pro ($99 + $149 = ~$250)
The Zoom H4n Pro is the simplest path into XLR recording. It’s a standalone digital recorder with two built-in XLR inputs and excellent preamps. Plug in your XLR mic with a standard XLR cable, insert an SD card, set your gain, and hit record. No computer required during the recording session. Transfer files to your computer afterward for editing.
This is my favorite beginner XLR setup because it’s genuinely simple and sounds excellent. You’re not managing drivers, not configuring software routing, not dealing with latency. You hit record and it works.
Zoom H4n Pro — $149 — View on Amazon →
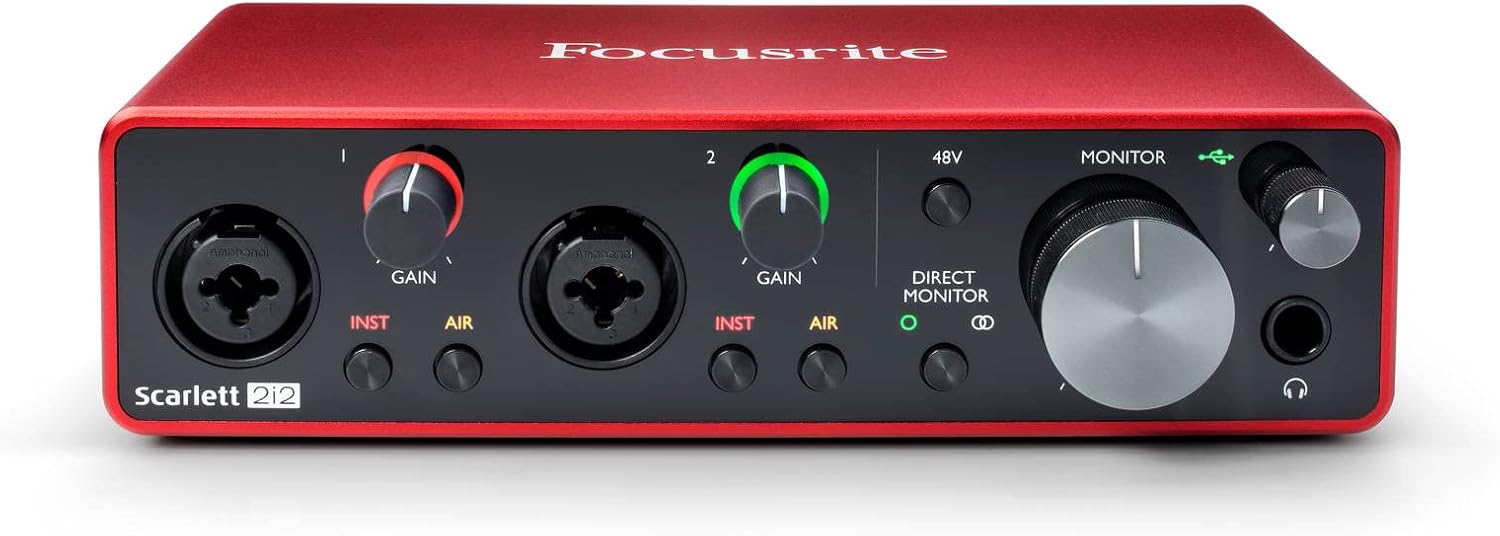
Option B: XLR Mic + Focusrite Scarlett Solo ($99 + $119 = ~$220)
If you prefer to stay in a computer-based workflow — recording directly into GarageBand, Audacity, Adobe Audition, or another DAW — the Focusrite Scarlett Solo is the right choice. One XLR input, crystal-clear preamps, USB-C to your computer. The most popular audio interface in the world for good reason.
The Scarlett Solo is actually slightly cheaper than the H4n and produces comparable audio quality. The tradeoff is that it requires a computer to be running during every recording session and doesn’t offer the same portability.
Focusrite Scarlett Solo — $119 — View on Amazon →
Which XLR Mic to Get
For most people making the USB-to-XLR switch, the Rode PodMic ($99) is the right choice. It was designed specifically for podcasting, sounds warm and broadcast-ready from day one, and works perfectly with both the H4n and the Scarlett Solo. It also has a built-in pop filter and shock mount, so you don’t need to buy accessories immediately.
If your budget is tighter, the Shure SM48 ($99) is equally excellent and arguably more durable. If you want to go premium, the Shure SM7B ($399) is the gold standard — but plan for a Cloudlifter ($149) if you pair it with the Scarlett Solo.
Rode PodMic — $99 — View on Amazon →
Step-by-Step: Making the Switch
1. Purchase your XLR microphone and interface or recorder of choice. 2. Connect the XLR cable from the mic’s output to the XLR input on the interface or recorder. 3. If using a Scarlett: connect the interface to your computer via USB-C and select it as your input in your recording software. If using the H4n: insert an SD card and set your gain. 4. Do a 30-second test recording and check your levels — peaks should be around -12dB during normal speech. 5. Record. That’s it. Welcome to XLR.
What to Do with Your USB Mic
Keep it as a backup. A USB mic is perfect for remote guest interviews where you want to ship something simple to a non-technical guest who doesn’t own any gear. Or sell it and put the money toward the rest of your XLR setup. Either way, once you’ve heard the difference XLR makes, you won’t want to go back. BOOM.
Comments are closed